There is no better way to understand how something works than to build your own version. So let's go through the steps which are needed to make resumability work and, in the process, get a better insight into why it is fast and demystify it.
Let's start with a basic application:
export function MyApp () {
  console.log('Render: MyApp');
  return <Greeter/>;
}

function Greeter() {
  console.log('Render: Greeter');
  const onClick = () => alert('hello world');
  return (
    <button onClick={onClick}>
      greet
    </button>
  );
}
Resumability requires server-side-rendering (SSR) or static-site-generation (SSG) so let's execute the above application on the server to produce this HTML:
<button>greet</button>
So if you look at the server log, you will see that we have executed the MyApp and Greeter, and therefore, it will have this output:
Render: MyApp
Render: Greeter
All of this is straightforward, and it is precisely how all frameworks work.
The above example is trivial. But let's assume that we don't just have two components but a complex tree of components. Now further assume that executing all of the components, retrieving the listeners, and attaching them to the DOM is expensive (which it is!) — both in terms of the amount of JavaScript which needs to be downloaded and the amount of JavaScript which must be executed. Hydration can take 15+ seconds on slow networks with older mobile phones.
We need to make the above HTML interactive. This means that we need to:
- Get a hold of the
onClickclick listener. - Attach it to the
button.
Getting hold of the listeners and figuring out where the listeners need to be attached is the fundamental problem that needs to be solved to make the application interactive.
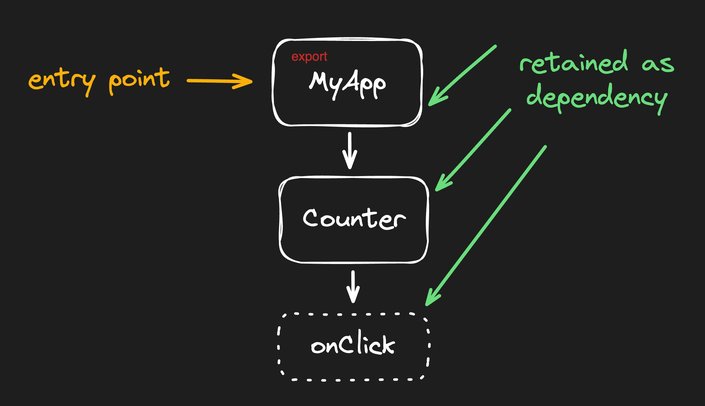
So how do you get a hold of the onClick listener? Well, notice
that the only thing that is exported is MyApp. This means that
the frameworks must start at the root component and execute all of the code to
retrieve onClick (as well as the button location.)
There is no other choice. The application bundle has a single export symbol,
so the framework's only option is to start there.
Starting with the root symbol means that we have to download the whole app. A tree shaker, by definition, needs to give you a complete application if you have a reference to a root component.
NOTE: Yes, lazy loading can happen for components not currently in the render tree, but that is a more advanced topic we may cover at some other point.
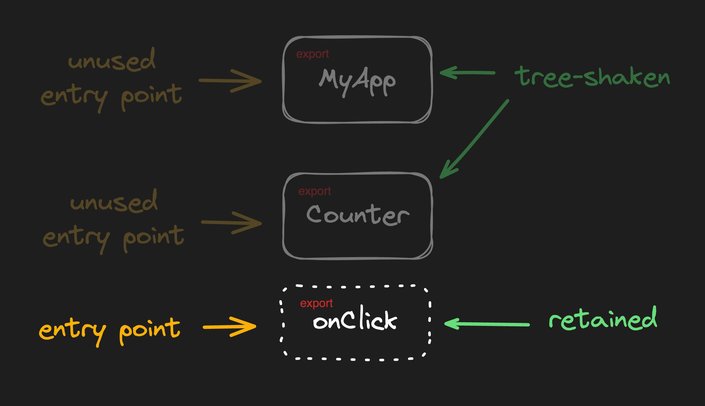
So if we want to get a hold of the onClick listener without starting with MyApp and traversing the whole tree, we need to change how the code is bundled. We need a way to get a hold of the onClick directly. By directly, I mean without having to traverse the component tree. This means that onClick needs to be exported.
So let's rewrite our application such that onClick is a top-level export:
export function MyApp () {
  console.log('Render: MyApp');
  return <Counter/>;
}

export const onClick = () => alert('hello world');

function Counter() {
  console.log('Render: Counter');
  return (
    <button onClick={onClick}>
      greet
    </button>
  );
}
NOTE: Writing code like this is unnatural, so we will discuss later how to automate this.
Now that the onClick is a top-level export it is possible for the framework to do this:
button.addEventListener('click', onClick);And just like that, our application is interactive! There is no need to start at the top-level export (MyApp) and execute all of the code to find where the listeners are. This is a substantial time savings, especially on mobile devices.
Also, notice that the tree shaker can now remove MyApp and Greeter components from the bundle. We are no longer referring to them! This is a time-saver because both of the components don't do anything in our application. It is just dead code. And so now we don't have to use bandwidth to transfer them.
Well, this isn’t so simple. How is the framework supposed to know which button, event, and exported function must be registered by addEventListener?
button.addEventListener('click', onClick);Also, executing addEventListener is still "code,” which needs to execute eagerly. Can we solve these problems? Could we execute no code?
All of the above can be solved by event delegation.
- Let's create a single
addEventListenerat the root of the DOM, which will rely on event bubbling and intercept all events. (The single global listener will remain; that is, there’s just one global listener, no matter how many instances of listeners we have in the DOM.) - Let's serialize the listener's location, type, and import the URL into HTML. So instead of generating:
<button>greet</button>
Our server will generate the following:
<button on:click="./someBundle.js#onClick">greet</button>
Notice that all of the information which we need is in the HTML:
- The location of the
on:clickattribute tells us the event listener is onbuttonelement. - The attribute name (
on:click) tells us we are looking for aclickevent. - Attribute value (
"./someBundle.js#onClick") tells us which bundle needs to be imported (./someBundle.js) and which symbol (onClick) needs to be invoked on the event. The best part is that (besides setting up the global listener) we don't need to execute any code (no invokingaddEventListenersor eagerly creating the event handler closures).
When the button is clicked, the browser bubbles the event. The global event listener captures the bubbled event. The global listener then looks for the on:click attribute and retrieves the event handler, executing it. This strategy lazily fetches the event handler instead of the eager execution of addEventListener, which requires the event listener to be present at the time of execution.
With this strategy, the browser executes the minimum amount of code necessary. Once the server has done its job, the browser resumes where the server left off. The resumability achieves minimum code delivery and lazy execution of the code, ultimately resulting in faster startup times, less network usage, and longer battery life.
The above example lacks two critical features of what makes something an application. State and data-binding! Without state and data-binding, the application is just a static page. So let's revisit all of the steps but this time with state and data-binding in mind.
Let's rewrite our example and add state and data-binding by changing it from Greeter to a Counter example.
export function MyApp () {
  console.log('Render: MyApp');
  return <Counter/>;
}

function Counter() {
  console.log('Render: Counter');
  const count = useSignal(123);
  const onClick = () => count.value++;
  return (
    <button onClick={onClick}>
      {count.value}
    </button>
  );
}
Here is where we run into a problem:
export const onClick = () => {
  count.value++; // ERROR: `count` is not declared
}

function Counter() {
  console.log('Render: Counter');
  const count = useSignal(123);
  return (
    <button onClick={onClick}>
      {count.value}
    </button>
  );
}
The fundamental problem we need to solve is that the exported function can't close over the state (count) of the component. How do we pass the count from the Counter to the onClick listener?
Let's rewrite our code to convert onClick from a closure that captures count to a function that gets count in another way.
export const onClick = () => {
  const [count] = __closedOverVars__;
  count.value++;
}

function Counter() {
  console.log('Render: Counter');
  const count = useSignal(123);
  return (
    <button onClick={withClosedOverVars(onClick, [count]}>
      {count.value}
    </button>
  );
}

let __closedOverVars__;
function withClosedOverVars(eventHandler, consts) {
  return (...args) => {
    __closedOverVars__ = consts;
    try {
      return eventHandler(...args);
    } finally {
      __closedOverVars__ = null;
    }
  }
}
By rewriting onClick to get its closed-over variables (count) from a special global location, we can have the onClick be a top-level export and, at the same time, act as if it closed over the count state.
The above solves our problem of being able to get a hold of a closure that is deep inside an existing component. However, if we want to invoke the event handler from a global listener, we will need to restore the state of the closedOverVars before we invoke it. So how do we restore the count state?
Well, notice that count contains two pieces of information:
- The state: is
123in this example. - The data-binding: of state to the
button’s text.
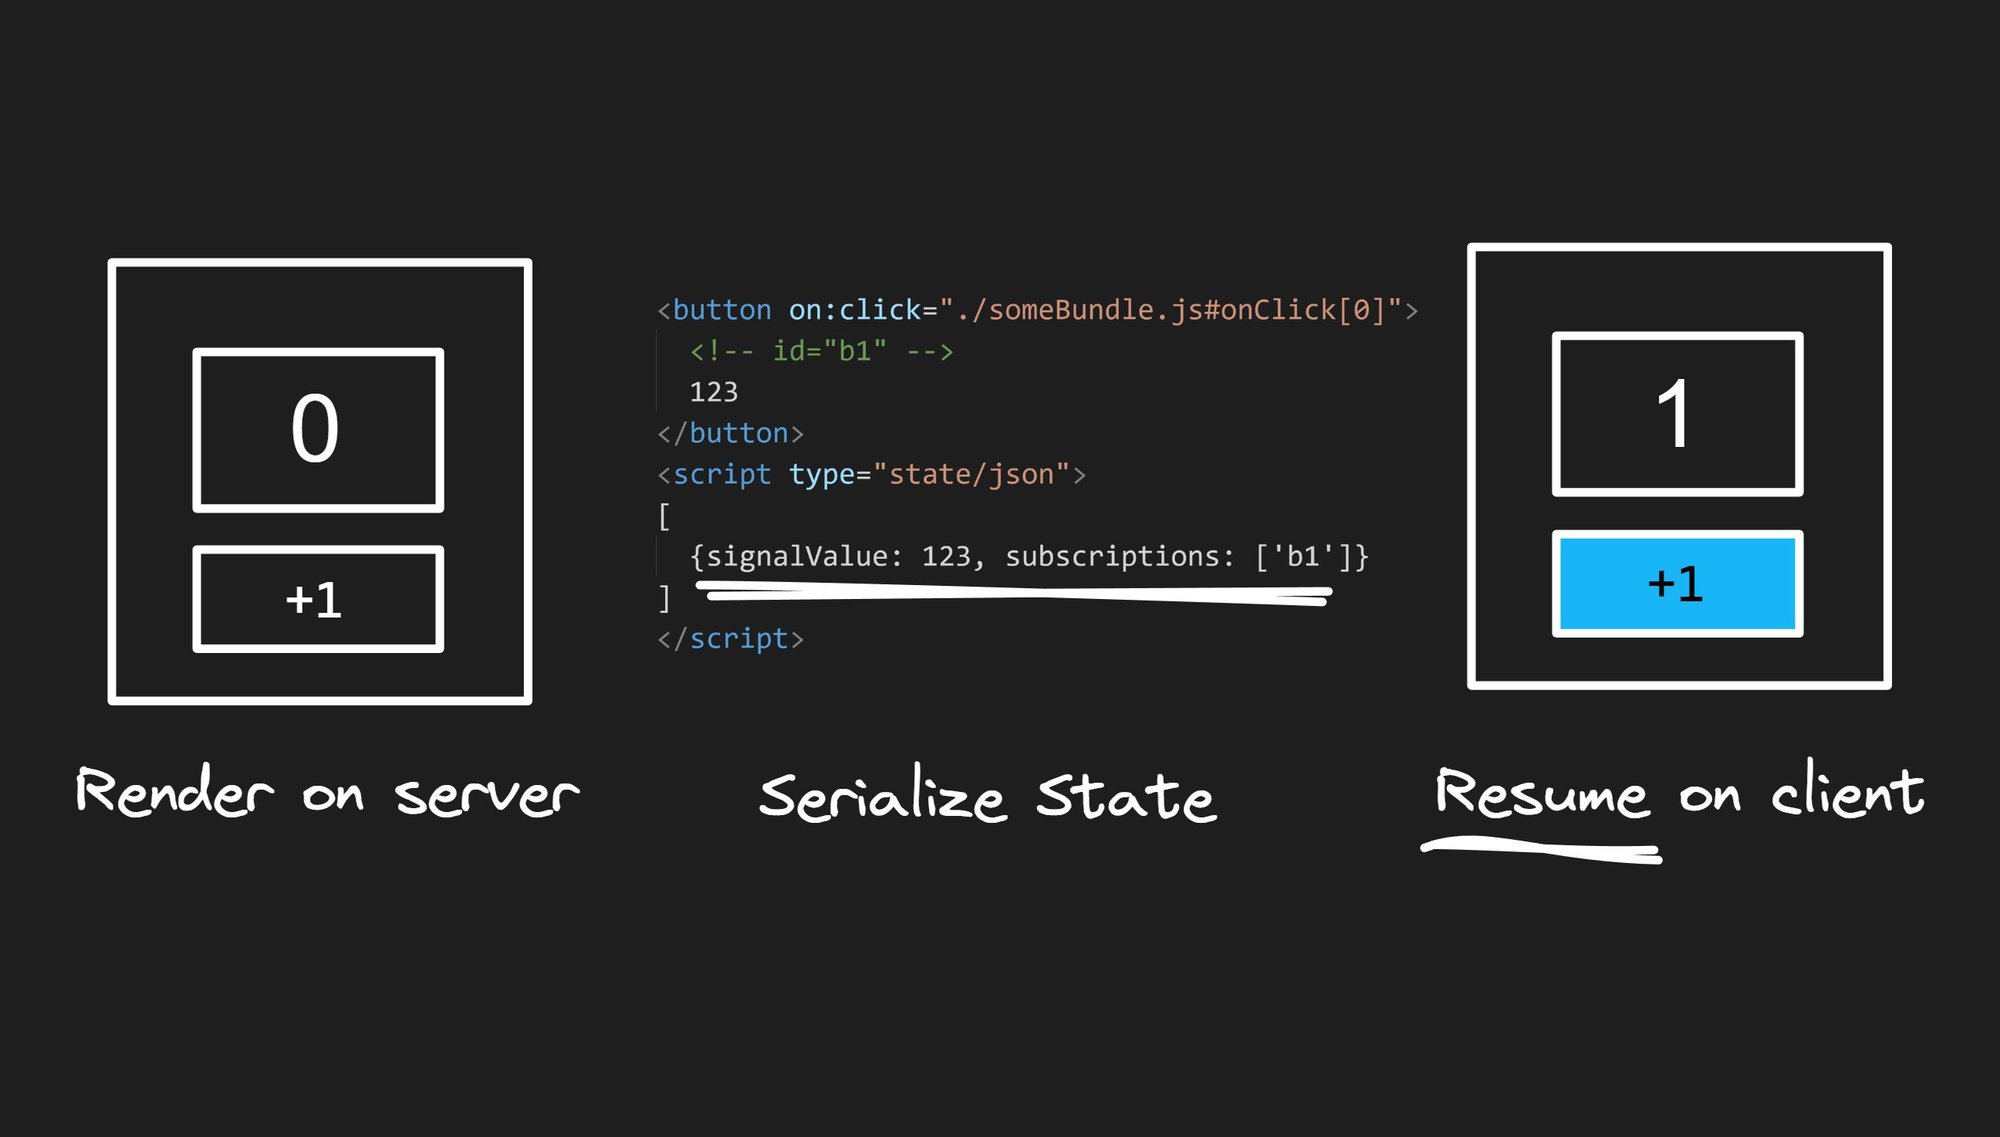
So let's look at how all of this information can be recovered by serializing not just the location of the events but also the associated state and data-binding information. The new HTML can store additional information like this.
<button on:click="./someBundle.js#onClick[0]">
  <!-- id="b1" -->
  123
</button>
<script type="state/json">
[
  {signalValue: 123, subscriptions: ['b1']}
]
</script>
The above is an extension of existing HTML with additional information about state and binding:
- Notice that the
on:clickhandler now contains additional information[0]. This says that the state at location0needs to be deserialized for the function to run. (See below) <!-- id="b1" -->identifies that the following text node in HTML is a data bound and assigns it a unique (arbitrary) ID ofb1.- The
<script>tag has JSON, which encodes that: there is a single Signal with an initial value of123and data - bound to theb1text node above. (Updating the signal value will require updating the associated DOM node.)
With all the above information, invoking the onClick method without downloading or executing
MyApp or Counter is now possible. It is now possible for the application to execute the
onClick handler without executing any initialization code of the application. The application resumes
where the server left off.
No one wants to write an application with such awkward syntax. We need to do something about the syntax to make it more natural.
Let's create a code pre-processor (a compiler) that can automatically rewrite our natural application code into the format we need for resumability. The transformation is mechanical and straightforward to implement (and explain to the developer.)
We need a way to annotate the source code so that the pre-processor (and the developer) know when such a transformation should be applied.
Let's create a rule that any function which ends with $ (such as anything$(..)) will automatically have the above transformation applied. So you can write code in a natural way:
export const MyApp = component$(() => {
  console.log('Render: MyApp');
  return <Counter/>;
});

export const Counter = component$(() {
  console.log('Render: Counter');
  const count = useSignal(123);
  return (
    <button onClick$={() => count.value++}>
      {count.value}
    </button>
  );
})
And the optimizer will know that the onClick needs to be extracted into an exported top-level function.
Notice that we have also wrapped components in component$() so that they too, can be loaded independently (discussed below.)Our applications are trees of components. Usually, we only export the root component from the tree, and only the root component is passed to the framework bootstrap method.

If you only have a single entry point into your application, it is difficult to do anything other than enter at the application at the root component and recursively traverse the component tree to learn about the application state, bindings, and event listeners.
Resumability is about continuing where the server left off. Resumability requires that each event listener can be imported directly and that the application state can be serialized.

Resumability is about transforming the application from a single entry point to many entry points. And the entry points need to be event listeners because a browser always resumes execution as a response to an event.
Resumability is about not downloading code that does not need to re-execute on the browser. This means that resumability needs to give choices to the bundler so that the bundler can tree-shake code-only-needed-for hydration.
The bundler can't tree-shake anything if we only export a top-level component to our application.
This is why each component is wrapped in component$() — to break the dependency between a parent and child component. Sometimes a component must be downloaded and executed, but we don't want to force the download and execution of child components.
Resumability requires that many things have top-level exports. We also ensure we don't have direct dependencies between parent and child components. This means that the top-level symbols tend to have a shallow dependency graph.
This makes it easy to move exported symbols between bundles and have a single or many bundles without changing the source code. Bundling becomes configuration information for the bundler and can be fine-tuned without refactoring the source code.
There are many benefits to resumability which extend past the fast startup of your application on slow networks or mobile devices.
Builder.io visually edits code, uses your design system, and sends pull requests.
Builder.io visually edits code, uses your design system, and sends pull requests.


 Connect a Repo


