Engaging with customers and prospects is a critical and constant demand, and as such, maintaining a blog can often be an integral part of any company’s brand. Within the world of CMS, blogs are an obvious use case that provides marketing and dev teams alike with a flexible way to maintain and manage huge amounts of content. Hundreds or even thousands of articles can be authored, edited, and arranged for efficient management of impactful content that can be shipped at the speed of now.
A cornerstone of Builder’s platform is the flexible composability we provide in mapping Builder functionality to your app’s exact use cases and setup. Here we walk through three of the most popular approaches that we see at Builder for implementing blogs, and the pros and cons for each approach:
- The data model approach — quick and simple; potentially rigid, requires developer to update templates
- The visual section model approach — flexible, dynamic, requires some dev setup, but total WYSIWYG freedom when authoring blog content
- The hybrid approach — flexible and dynamic, requires more initial architecting, but blog content can dynamically use templates or freeform WYSIWYG editing
Tip: For this article we are using the NextJS Page router but the logic and general data flow would be the same for the NextJS App Router, or really any framework. Find more in info in our Blueprints and Integration docs for Page, Section or Data models
Structured Data models are at the core of any CMS, and Builder is no different. With live editing and previewing, Builder Data models have the unique ability to view your content while editing in real-time, as if you were on your live site in an almost exact 1:1 preview experience.
With the Data model approach to building your blog, you can fetch Builder data and plug it into your existing blog templates across any framework, or build new ones in code to render dynamic content quickly with this straightforward approach.
To utilize this approach, first, you need to create a Data model to contain all of your blog content.
Lets create a data model in Builder named blog-article, to store and create blog articles:
| Name | Type | Notes |
|---|---|---|
Title | text | This is the article title when listing articles and for the page |
Slug | text | This is the URL handle; for example, new-product-line |
Image | file | This is the main image for the blog post—for example, when listing articles—as well as the og:image for previewing on social media sites like Facebook. |
Date | timestamp | This is the date for displaying when this was posted and for filtering by date posted. |
Content | HTML | This can be HTML or long text and will contain the content of your blog article itself. If you have more complicated content or a standardized setup, you could define individual sections, or as a list of sections, in which case this could be a `list` input and the individual items would be `html` |
Blurb | text | Optional This is the preview text when listing blog articles, and optionally can be the SEO meta description as well. |
Author | reference | Optional Use this to list info about authors. We recommend making a new data model—for example, with fields full name of type text and photo or type file—and using a reference type to reference the author for an article. |
Once you have created your Data model, you can then fetch the data using one of Builder’s SDK or APIs and plug it into the appropriate slots within your code. For our Next JS app, that might looks something like this:
// code snippet for /blog/[slug].js
import { useRouter } from 'next/router'
import { builder, useIsPreviewing, BuilderContent } from '@builder.io/react'

export async function getStaticProps({ params }) {

 const articleData =
   (await builder
     .get('blog-article', {
       query: {
           'data.slug': params?.slug
       },
       //enrich the data to make sure our author reference includes all content
       options: {
         enrich: true
       },
     }).toPromise()) || null

 return {
   props: {
     articleData
   },
   // Next.js will attempt to re-generate the page:
   // - When a request comes in
   // - At most once every 5 seconds
   revalidate: 5,
 }
}

export async function getStaticPaths() {
 const articles = await builder.getAll('blog-article', {
   options: { noTargeting: true },
   fields: 'data.slug',
 })

 return {
   //generate all the article paths from their associated slug
   paths: articles.map((article) => `/blog/${article.data?.slug}`),
   fallback: true
 }
}

export default function BlogArticle({ articleData }) {
 const router = useRouter();
 const isPreviewingInBuilder = useIsPreviewing();
 const show404 = !articleData && !isPreviewingInBuilder;

 if (router.isFallback) {
   return <h1>Loading...</h1>
 }
 return (
   <>
     <Header />
     //use BuilderContent to get live editing and previewing of a data model
     <BuilderContent model="blog-article" content={articleData}>
       {(data, loading, fullContent) => (
         <div>
          // we are using components from our app and plugging in inputs from our data model
           <HeroContainer backgroundImage={data?.image}>
               <Title>
                   {data?.title}
               </Title>
               <Eyebrow>{data?.blurb}</Eyebrow>
               <AuthorBlock>
                 By {data?.author?.value?.data?.name}
                 <div>{showTime(data?.timestamp)}</div>
               </AuthorBlock>
           </HeroContainer>
           <div>
             {data?.content?.map((item, index) => (
               <Section key={index} backgroundImage={item.banner.backgroundImage}>
                 {item?.content}
               </Section>
             ))}
           </div>
         </div>
       )}
     </BuilderContent>
     <Footer />
   </>
 )
}
Great! Now we are feeding any article data model content entry into our blog articles. Let’s walk through each step of this code to see what exactly is going on.
In our getStaticPaths call, we are fetching all of our articles to generate each page based on the slug:
export async function getStaticPaths() {
 const articles = await builder.getAll('blog-article', {
   options: { noTargeting: true },
   fields: 'data.slug',
 })

 return {
   paths: articles.map((article) => `/blog/${article.data?.slug}`),
   fallback: true
 }
}
Tip: If you have more than 100 entries in a model and want to generate all paths, you may need to loop over your entries, as explained in this forum post: What's the maximum limit allowed in a single content API call?
Then, in getStaticProps, we are querying Builder for a blog-article model entry with a slug that matches the slug provided to us by the NextJS routing params object. We then pass that articleData content object to the client as part of props
export async function getStaticProps({ params }) {
 const articleData =
   (await builder
     .get('blog-article', {
       query: {
           'data.slug': params?.slug
       },
       //enrich the data to make sure our author reference includes all content
       options: {
         enrich: true
       },
     }).toPromise()) || null

 return {
   props: {
     articleData
   },
   // Next.js will attempt to re-generate the page:
   // - When a request comes in
   // - At most once every 5 seconds
   revalidate: 5,
 }
}
Now that we have the articleData content object from Builder and have passed it to the client, we can then access that data to populate components within our app. In this example, we have some custom components from our app that render the content provided:
export default function BlogArticle({ articleData }) {
 const router = useRouter();
 const isPreviewingInBuilder = useIsPreviewing();
 const show404 = !articleData && !isPreviewingInBuilder;

 if (router.isFallback) {
   return <h1>Loading...</h1>
 }

 return (
   <>
     <Header />
     <BuilderContent model="blog-article" content={articleData}>
       {(data, loading, fullContent) => (
         <div>
           <HeroContainer backgroundImage={data?.image}>
               <Title>
                   {data?.title }
               </Title>
               <Eyebrow>{data?.blurb}</Eyebrow>
               <AuthorBlock>
                 By {data?.author?.value?.data?.name}
                 <div>{showTime(data?.timestamp)}</div>
               </AuthorBlock>
           </HeroContainer>
           <div>
             {data?.content?.map((item, index) => (
               <Section key={index} backgroundImage={item.banner.backgroundImage}>
                 {item?.content}
               </Section>
             ))}
           </div>
         </div>
       )}
     </BuilderContent>
     <Footer />
   </>
 )
}
You may notice that we have wrapped the entire blog’s contents in a <BuilderContent/> element, provided from our React SDK. What is this doing exactly? By passing in the entire Builder content object to the content prop, we are able to render the blog data server side, which is absolutely necessary for top site performance.
By passing in the model name of our content, we are telling the Builder Visual Editor to watch this block for any changes of props (for example, our inputs), which will then cause a re-render. This won’t affect the end user’s experience on our live site, but within the Builder Visual Editor, it does something quite unique. It turns this from a standard structured data entry you find in any regular CMS, to a Builder live editing experience.
Finally, to get the live editing to work within Builder, we must go back to our model config, and enter in a Preview URL. This Preview URL can be a Page where the Data model will eventually be rendered, and even be set to be some dynamic URL based on our inputs. In this instance, let’s edit the Data model to be based on our slug.
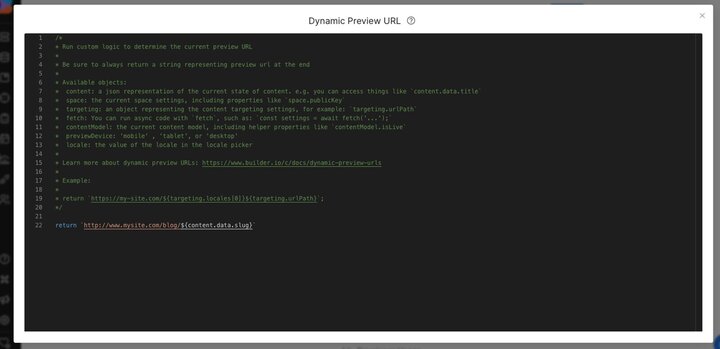
By doing this, we are saying that whenever you click into a Builder entry, load the page on my site where this Data model will eventually be rendered. Now, instead of just regular data inputs, we have a full editing experience with a preview of how the site will render for our end users:
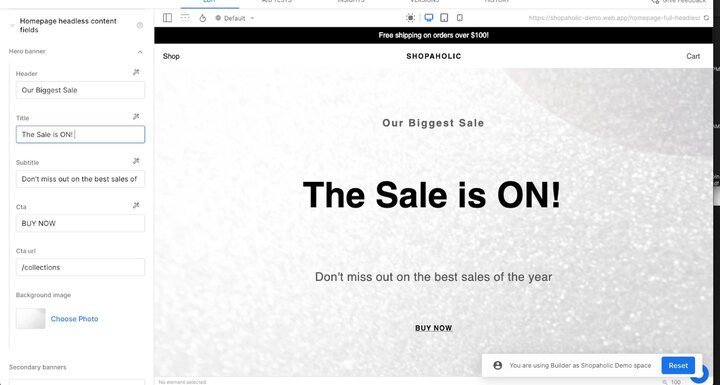
By using this <BuilderContent /> paradigm, you will even be able to use the Builder Chrome extension to hop directly into your blog Data model entry from your live site with ease.
Amazing! Now you have a full Builder editing and previewing experience with just a simple data model. We were able to utilize an existing blog template within our code and only had to make a few changes. This is a great start, but I actually think we can do better. While this was a breeze to implement, what if I told you we can make it even easier — and more flexible — by removing most of our code altogether?
PROS:
- Push content live at any moment
- Utilize your existing code-based blog templates
- Stricter guardrails on design
CONS:
- Limited flexibility compared to our other approaches
- Design bottlenecked, developers would need to update code templates
Continuing off of the approach outlined above, what if instead of populating code-based templates with data, we wanted to utilize the Builder WYSIWYG Visual Editor along with our data fields? What if we wanted to give our editors free rein to create visual experiences without having to wait on costly and time-consuming code changes? That brings us to the Section model approach.
We start with pretty much the same setup as before, but this time, we create a Section model.
Let's create a Section model in Builder named blog-article, to store and create blog articles, but this time we don’t need a content input field because that will be handled in the Builder Visual Editor.
Theoretically, you don’t need most of these fields, as you can handle everything directly in your visual Section model if you like, but for this demo we will take a hybrid approach of rendering some content in code, and the actual blog content in a Builder visual Section model:
| Name | Type | Notes |
|---|---|---|
Title | text | This is the article title when listing articles and for the page |
Slug | text | This is the URL handle; for example, new-product-line |
Image | file | This is the main image for the blog post—for example, when listing articles—as well as the og:image for previewing on social media sites like Facebook. |
Date | timestamp | This is the date for displaying when this was posted and for filtering by date posted. |
Blurb | text | Optional This is the preview text when listing blog articles, and optionally can be the SEO meta description as well. |
Author | reference | Optional Use this to list info about authors. We recommend making a new data model—for example, with fields full name of type text and photo or type file—and using a reference type to reference the author for an article. |
You can create as many additional fields as you like for additional info as necessary.
Our code flow and logic will be very similar to the Data model approach, with one key difference: we will replace the content sections of our article with a dynamic <BuilderComponent/> element.
// code snippet for /blog/[slug].js
import { useRouter } from 'next/router'
import { builder, useIsPreviewing, BuilderContent } from '@builder.io/react'

export async function getStaticProps({ params }) {

 const articleData =
   (await builder
     .get('blog-article', {
       query: {
           'data.slug': params?.slug
       },
       //enrich the data to make sure our author reference includes all content
       options: {
         enrich: true
       },
     }).toPromise()) || null

 return {
   props: {
     articleData
   },
   // Next.js will attempt to re-generate the page:
   // - When a request comes in
   // - At most once every 5 seconds
   revalidate: 5,
 }
}

export async function getStaticPaths() {
 const articles = await builder.getAll('blog-article', {
   options: { noTargeting: true },
   fields: 'data.slug',
 })

 return {
   //generate all the article paths from their associated slug
   paths: articles.map((article) => `/blog/${article.data?.slug}`),
   fallback: true
 }
}

export default function BlogArticle({ articleData }) {
 const router = useRouter();
 const isPreviewingInBuilder = useIsPreviewing();
 const show404 = !articleData && !isPreviewingInBuilder;

 if (router.isFallback) {
   return <h1>Loading...</h1>
 }

 return (
   <>
     <Header />
     //use BuilderContent to get live editing and previewing of a data model
     <BuilderContent model="blog-article" content={articleData}>
       {(data, loading, fullContent) => (
         <div>
          // we are using components from our app and plugging in inputs from our data model
           <HeroContainer backgroundImage={data?.image}>
               <Title>
                   {data?.title}
               </Title>
               <Eyebrow>{data?.blurb}</Eyebrow>
               <AuthorBlock>
                 By {data?.author?.value?.data?.name}
                 <div>{showTime(data?.timestamp)}</div>
               </AuthorBlock>
           </HeroContainer>
           <div>
             <BuilderComponent model=”blog-article” content={fullContent}/>
           </div>
         </div>
       )}
     </BuilderContent>
     <Footer />
   </>
 )
}
So what exactly is going on in this code?
As in the data model example, we are fetching the content from Builder on the server using our builder.get() function call. In this example though, we are rendering the metadata around the article (such as title, author, and header photo) in our code, but rendering the bulk of the content in our Builder visual component:
<BuilderComponent model="Blog-article" content={fullContent} />By passing the fullContent JSON into BuilderComponent, Builder will render whatever visual experience is authored in the Visual Editor. So this approach gives us the best of both worlds! We are using the data associated with each article to populate a template within our blog, and then our editors have the flexibility to customize the content however they like! We don’t have to create redundant content on each page, and editors can focus on just the unique sections of each entry. We can also use the data from the data fields to build filters, navigation sidebars, or any other host of components throughout our site.
If this blog style seems familiar, it is because we use it in our very own Builder Blog: https://www.builder.io/blog (Blueprint here)
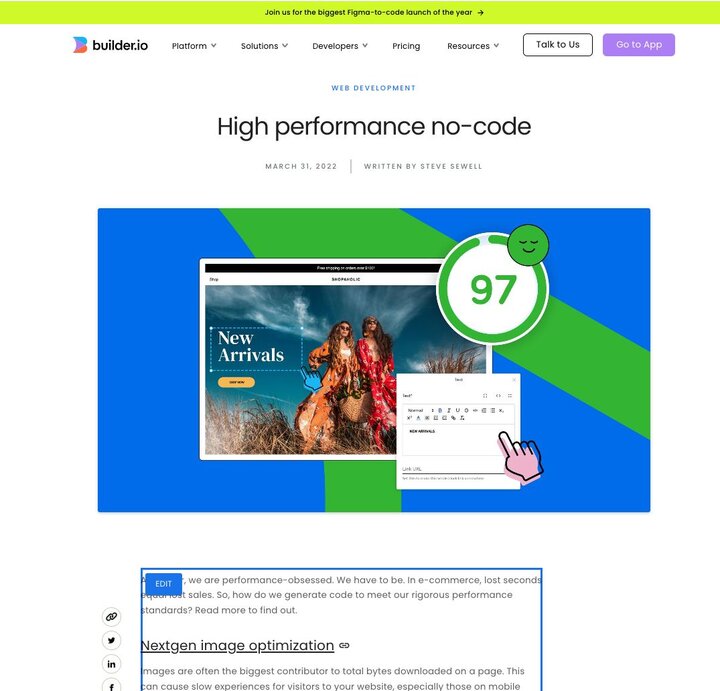
In this screenshot,the outer section, representing our , is populating the title, data, author, hero image of the blog post, and the inner section, which is a drag-and-drop editable Section model.
You can see and even test this exact code in our example application here: https://github.com/BuilderIO/builder/blob/main/examples/next-js-builder-site/src/pages/blog/%5Barticle%5D.tsx
PROS:
- Push content live at any moment
- Flexible drag and drop functionality on your live website
- Mix of flexibility and guardrails
CONS:
- Each page is designed and authored independently
- Developers required for code-based template sections
OK. We have created a blog purely in code that is populated by a Data model. And we have created a blog that uses a code template, but allows for flexible creativity when creating our content. Both have pros and cons, and both have use cases where they make the most sense.
But what would happen if we combined the logic of both and utilized a mix of Data models and Section models to get the flexibility of a WYSIWYG editor, with the convenience of a template? We want a paradigm that emphasizes composability and streamlines authoring of content. And what if we were able to completely remove our reliance on developers to update our templates?
Enter…the Hybrid approach! With this setup, we will be able to author blog articles at scale, with live editing and previewing, while also having the ease of using templates that we build and manage within Builder.
For the Hybrid Approach, we need 2 models:
Let's create a Data model in Builder named blog-article, to store and create blog articles:
| Name | Type | Notes |
|---|---|---|
Title | text | This is the article title when listing articles and for the page |
Slug | text | This is the URL handle; for example, new-product-line |
Image | file | This is the main image for the blog post—for example, when listing articles—as well as the og:image for previewing on social media sites like Facebook. |
Date | timestamp | This is the date for displaying when this was posted and for filtering by date posted. |
Content | HTML | This can be HTML or longtext and will contain the content of your blog article itself. If you have more complicated content or a standardized setup, you could define individual sections, or as a list of sections, in which case this could be a `list` input and the individual items would be `html` |
Blurb | text | Optional This is the preview text when listing blog articles, and optionally can be the SEO meta description as well. |
Author | reference | Optional Use this to list info about authors. We recommend making a new data model—for example, with fields full name of type text and photo or type file—and using a reference type to reference the author for an article. |
You can create as many additional fields as you like for additional info as necessary.
For this data model we want to use our live previewing and editing, so we will set the same dynamic Preview URL logic as in the Data model approach above:

By doing this we are saying that whenever you click into a Builder content entry, load a preview for the page on my site where this data model will eventually be rendered.
Next, let's create a section model called blog-article-template that we will use to build our template and populate with our article data:
| Name | Type | Notes |
|---|---|---|
Preview Article | reference | This is a reference to the |
You can create as many additional fields as you like for as necessary for each template we create.
For the Section model, we will do a similar preview URL logic as the Data model, but instead of being based on a slug, it will be based on a preview article selected from the preview article reference. In this way, editors can see any version of the blog in the template created:
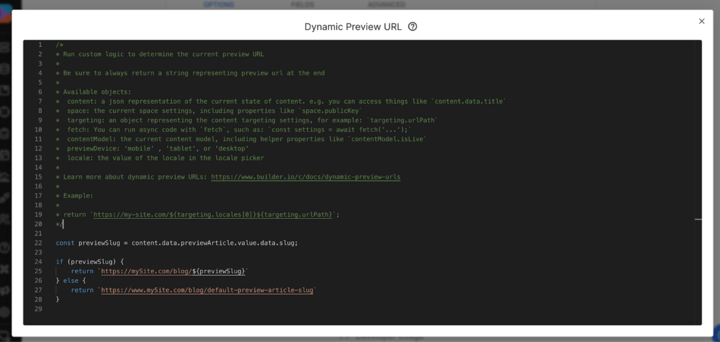
Now the code:
// code snippet for /blog/[slug].js
import { useRouter } from 'next/router'
import { builder, useIsPreviewing, BuilderContent } from '@builder.io/react'

export async function getStaticProps({ params }) {

 const articleData =
   (await builder
     .get('blog-article', {
       query: {
        'data.slug': params?.slug
       },
       //enrich the data to make sure our author reference includes all content
       options: {
         enrich: true
       },
     }).toPromise()) || null
 const articleTemplate =
   (await builder
     .get('blog-article-template', {
       //enrich the data to make sure our author reference includes all content
       options: {
         enrich: true
       },
     }).toPromise()) || null

 return {
   props: {
     articleData,
     articleTemplate
   },
   // Next.js will attempt to re-generate the page:
   // - When a request comes in
   // - At most once every 5 seconds
   revalidate: 5,
 }
}

export async function getStaticPaths() {
 const articles = await builder.getAll('blog-article', {
   options: { noTargeting: true },
   fields: 'data.slug',
 })

 return {
   //generate all the article paths from their associated slug
   paths: articles.map((article) => `/blog/${article.data?.slug}`),
   fallback: true
 }
}

export default function BlogArticle({ articleData, articleTemplate }) {
 const router = useRouter();
 const isPreviewingInBuilder = useIsPreviewing();
 const show404 = !articleData && !isPreviewingInBuilder;

 if (router.isFallback) {
   return <h1>Loading...</h1>
 }

 return (
   <>
     <Header />
     //use BuilderContent to get live editing and previewing of a data model
     <BuilderContent model="blog-article" content={articleData}>
       {(data, loading, fullContent) => (
        //pass the template to the content prop for server-side rendering, but pass the article data to the data prop to access within our template
        <BuilderComponent model="blog-article-template" content={articleTemplate} data={{article: fullContent}} options={{enrich: true}}/>
       )}
     </BuilderContent>
     <Footer />
   </>
 )
}
The logic here should start to feel fairly familiar:
- Fetch the article data based on the slug.
- Fetch our article template.
- Generate paths based on all article slugs.
- Pass data to the client to render.
On the client, by passing the article data to <BuilderContent /> we can get the live previewing in the Data model preview.
By passing blog template content to the <BuilderComponent /> content prop, we will render the UI of our blog template. And notice how we are passing the article data through the data prob? This is the key part of how we put all the pieces together and will give our template access to the article Data model.
<BuilderContent model="blog-article" content={articleData}>
  {(article, loading, fullContent) => (
    //pass the template to the content prop for server-side rendering, but pass the article data to the data prop to access within our template
    <BuilderComponent model=”blog-article-template” content={articleTemplate} data={{article: data}} options={{enrich: true}}/>
  )}
</BuilderContent>To understand how this fits together, let’s move to the blog template editing experience within Builder.
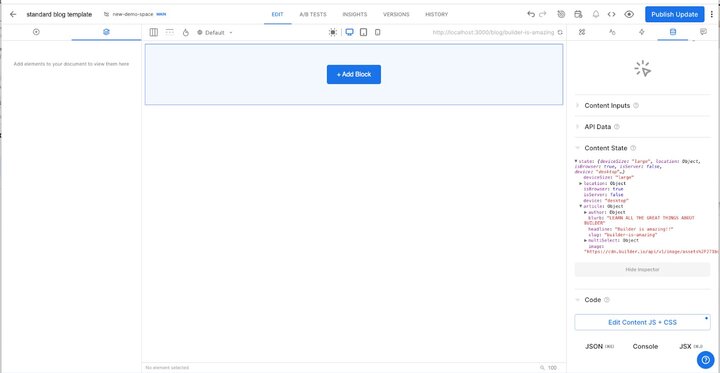
Within the data dab, our article data is now available in our template to set up data bindings. Here, we can build a template to render all our article data.
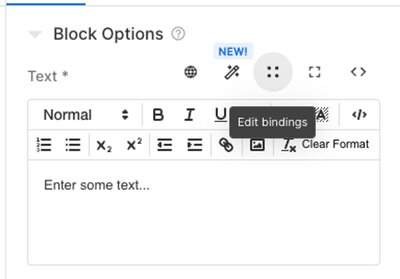
For example, let’s drop a text element on the page for our headline. In the Options tab, the 4 dots indicate that we can up our data binding.
Builder will recognize the data we have passed into it from our article so we can set that as the data on the page.
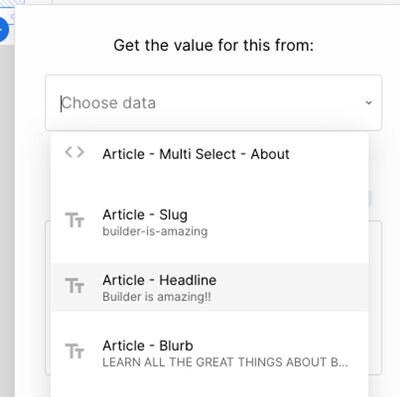
We can continue to do this down the page until we have populated all our fields with our dynamic data from our article data model.
You can style all of the content as you want and now, you no longer have to engage your development team any time you want to update your template! What's more is you can even start to create different templates for different article types and really unlock the flexibility of the Builder platform. Let's say you want a different template for how-to blog posts versus case study blog posts. In that case, on your article model you’d add an input for the category and then in your code, you’d use targeting to set which template you want to fetch based on the current articles category:
const articleTemplate =(await builder
  .get('blog-template', {
    userAttributes: {
      category: articleData.data.category
    },
    options: {
      enrich: true
    }
  }).toPromise()) || null
Then, in your blog template, you’d make sure to add the same targeting so you’d only get the correct template for a given article.
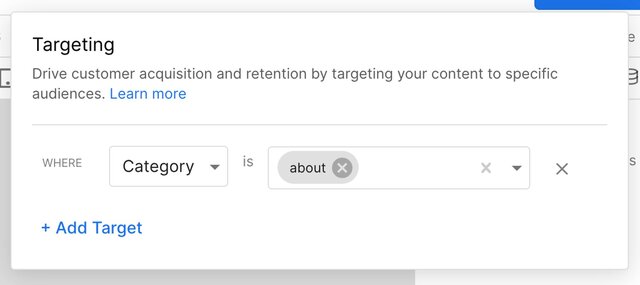
You could even target by specific URL or slug to have the ability to create totally unique templates for a specific article as needed. Really, the sky's the limit!
PROS:
- Composable data can be used throughout your app
- Full drag and drop flexibility without having to reinvent the wheel for each and every article
- Wideranging flexibility, with guardrails through permissions and workflows
CONS:
- Multi-step integration takes some planning and may be over engineered for some simpler use cases
Interested in seeing some of this logic in action? Check out this YouTube video one of our Customer Engineers created explaining the setup and data flow https://www.youtube.com/watch?v=n1o2ouhOeA0
And there you have it! All of these approaches can of course be customized or altered to meet your exact needs! This also only covers setting up the articles themselves, for creating the landing page for all articles, check out our Blueprint section here: Blog Article List Code Example
Try it out and let us know how it goes!
Introducing Visual Copilot: a new AI model to convert Figma designs to high quality code in a click.
No setup needed. 100% free. Supports all popular frameworks.
Introducing Visual Copilot: a new AI model to convert Figma designs to high quality code in a click.
No setup needed. 100% free. Supports all popular frameworks.
Builder.io visually edits code, uses your design system, and sends pull requests.
Builder.io visually edits code, uses your design system, and sends pull requests.


 Connect a Repo


