The App Router in Next.js 14 provides a set of conventions to help you implement advanced routing patterns, one of which is parallel routes. In this blog post, we will learn what parallel routes are, how to define them, and the benefits they offer when creating dynamic and complex user interfaces.
Parallel routes are an advanced routing mechanism that allows for the simultaneous rendering of multiple pages within the same layout. Let's explore this concept with a practical example.
Consider the challenge of building a complex dashboard for a web application. Such a dashboard might need to display various views like user analytics, revenue metrics, and notifications, all at once.
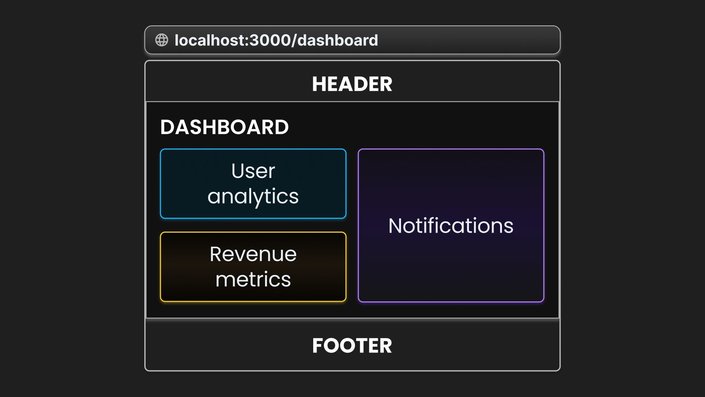
Traditionally, we would create components for each section and arrange them in the layout.tsx file within an app/dashboard folder. The code might look like this:
// app/dashboard/layout.tsx

import UserAnalytics from "@/components/UserAnalytics";
import RevenueMetrics from "@/components/RevenueMetrics";
import Notifications from "@/components/Notifications";

export default function DashboardLayout({
  children,
}: {
  children: React.ReactNode;
}) {
  return (
    <>
      <div>{children}</div> {/* Content from page.tsx */}
      <UserAnalytics /> {/* Component for user analytics */}
      <RevenueMetrics /> {/* Component for revenue metrics */}
      <Notifications /> {/* Component for notifications */}
    </>
  );
}
In this setup, the layout automatically receives the default component exported from app/dashboard/page.tsx as the children prop, which is then rendered within the layout. For simplicity, let's assume page.tsx renders just a title “Dashboard”. Each of the other components represents a specific section of the dashboard, such as a Card with the necessary data rendered inside.
While this traditional approach of component composition is effective, using parallel routes can achieve the same outcome with additional benefits. So, how do we define parallel routes in Next.js?
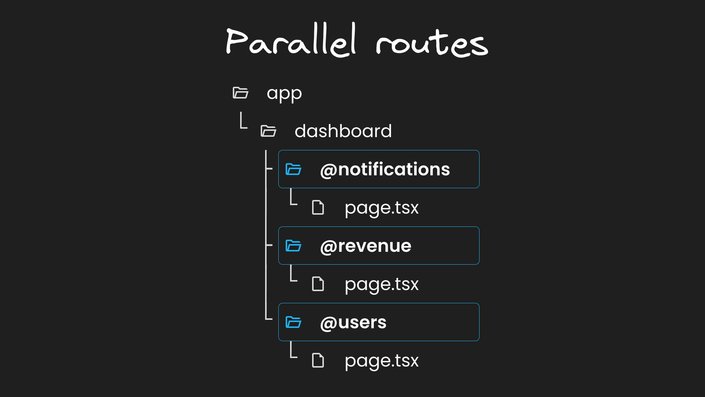
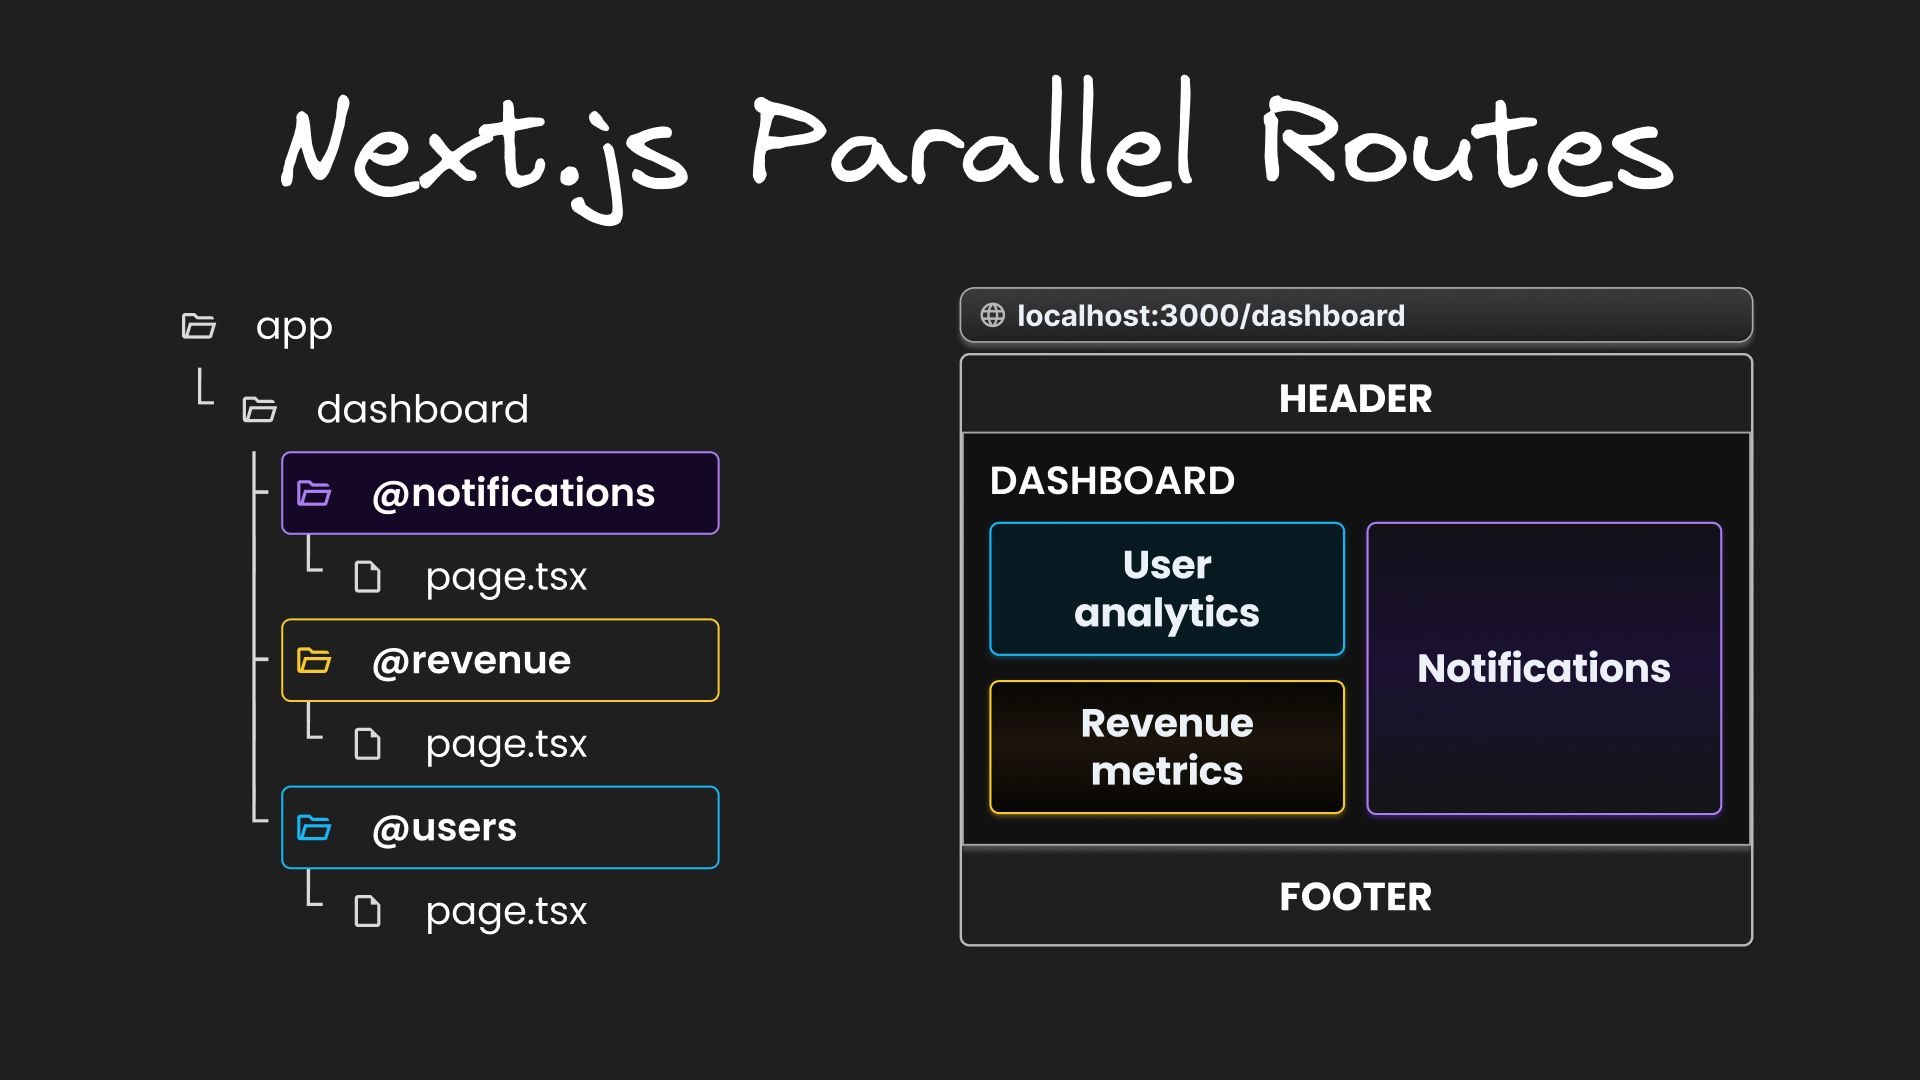
Parallel routes in Next.js are defined using a feature known as slots. Slots help structure our content in a modular fashion. To define a slot, we use the @folder naming convention. Each slot is then passed as a prop to its corresponding layout.tsx file .
In the context of our dashboard example, we would define three distinct slots within the dashboard folder: @users for the user analytics section, @revenue for the revenue metrics section, and @notifications for the notifications section:
// app/dashboard/@notifications/page.tsx
export default function Notifications() {
  return <div>Notifications</div>;
}

// app/dashboard/@revenue/page.tsx
export default function RevenueMetrics() {
  return <div>Revenue Metrics</div>;
}

// app/dashboard/@users/page.tsx
export default function UsersAnalytics() {
  return <div>User Analytics</div>;
}
Find the source code, including inline styles, in my GitHub repo.
Each slot is automatically passed to the layout as a prop, which we can use to structure the dashboard page. For simplicity, styling is omitted from the JSX.
// slots are available as props in the layout

export default function DashboardLayout({
  children,
  users,
  revenue,
  notifications,
}: {
  children: React.ReactNode,
  users: React.ReactNode,
  revenue: React.ReactNode,
  notifications: React.ReactNode,
}) {
  return (
    <div>
      <div>{children}</div>
      <div>{users}</div>
      <div>{revenue}</div>
      <div>{notifications}</div>
    </div>
  );
}
You can see that the slots are available as props, and we don’t have to import them. When navigating to localhost:3000/dashboard, the UI remains the same as before.
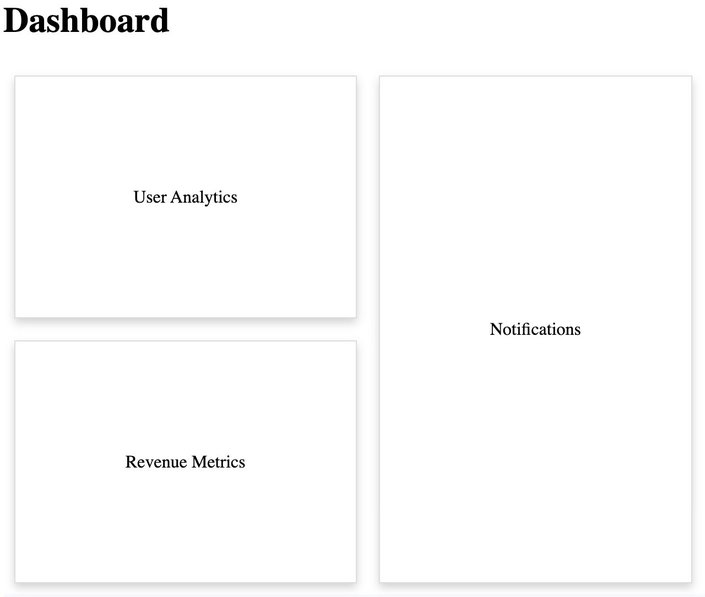
It is important to note that slots are not route segments and do not affect the URL structure. What you should also know is that the children prop is an implicit slot that does not need to be mapped to a folder, which is why dashboard/page.tsx is equivalent to dashboard/@children/page.tsx.
But what is the benefit of building our user interface with parallel routes?
A clear benefit of parallel routes is their ability to split a single layout into various slots, making the code more manageable. This is particularly advantageous when different teams work on various sections of the page.
However, the true benefit of parallel routes lies in their capacity for independent route handling and sub-navigation. Let’s take a closer look at these benefits.
One of the most compelling features of parallel routes is the ability to handle each route independently. This means that each slot of your layout, such as user analytics or activity logs, can have its own loading and error states. This granular control is particularly beneficial in scenarios where different sections of the page load at varying speeds or encounter unique errors.
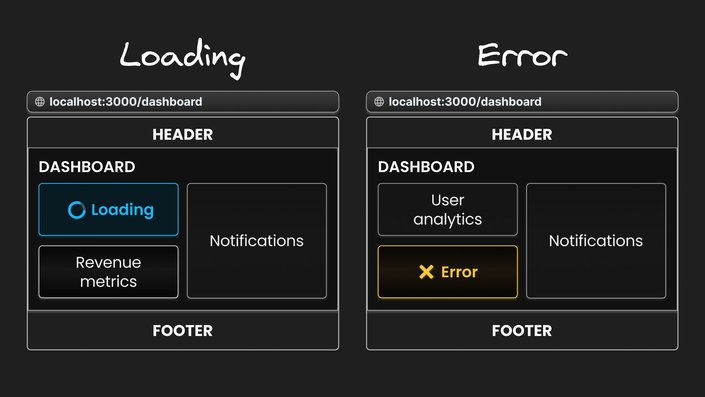
For instance, if the user analytics data takes longer to load, you can display a loading spinner specifically for that section, while other parts of the dashboard remain interactive. Similarly, if there's an error in fetching revenue metrics, you can show an error message in that specific section without affecting the rest of the dashboard. This level of detail in handling states not only improves the user experience but also simplifies debugging and maintenance.
Another significant advantage of using parallel routes is their capability to offer a seamless sub-navigation experience within each parallel route. Each slot of your dashboard can essentially function as a mini-application, complete with its own navigation and state management. This is especially useful in a complex application such as our dashboard where different sections serve distinct purposes.
Imagine each section of your dashboard – be it user analytics, revenue metrics, or notifications – operating as a standalone entity. Users can interact with each section independently, applying filters, sorting data, or navigating through pages, without affecting the state or display of other sections.
For instance, in the notifications section, users can switch to an "archived" view from the default view. This interaction allows them to view past notifications that are no longer in the main feed. The ability to toggle between the default and archived views, and the interactions within each, are confined to the notifications section alone. The URL in the address bar updates to reflect the current view, ensuring that the link is always shareable helps users know where they are on the site.
This approach allows for a more dynamic and interactive user experience, as users can navigate through different parts of the application without unnecessary page reloads or layout shifts.
Working with Parallel Routes and Sub-Navigation
When implementing parallel routes and sub-navigation, it's essential to understand a key concept. To understand what that is, we will focus on an implementation scenario involving archived notifications within our dashboard.
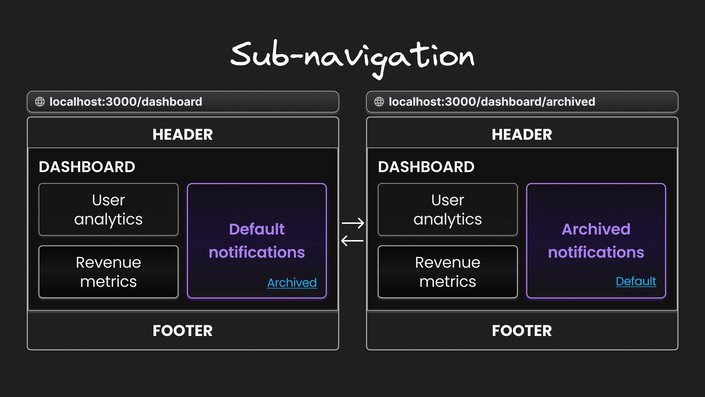
In this example, we will add sub-navigation to the notifications section of our dashboard. This will involve creating a link within the notifications slot to access the archived notifications page and a reciprocal link in the archived notifications page to return to the default page.
- Navigating to archived notifications: In
dashboard/@notifications/page.tsx, include a link to the archived notifications: - Setting up the archived notifications route: Inside the
@notificationsfolder, create anarchivedsubfolder. Define a page here that features a link back to the/dashboardroute, which displays the default notifications view.
This setup allows seamless navigation between the default and archived notification views, without impacting other sections of the dashboard.
However, it's important to consider how this affects other parts of the dashboard, particularly the behavior of the children, users, and revenue slots since they don't have an archived folder defined.
By default, the content rendered within a slot matches the current URL. In our dashboard folder, we have four slots: children, users, revenue and notifications. All these slots render their defined content when visiting localhost:3000/dashboard. However, when navigating to localhost:3000/dashboard/archived, only the notifications slot has a matching route. The other three slots - children, users, and revenue - become unmatched.
When dealing with an unmatched slot, the content rendered by Next.js depends on the routing approach:
- Navigation from the UI: In the case of navigation within the UI, Next.js retains the previously active state of a slot regardless of changes in the URL. This means when you navigate between the default notifications at
/dashboardand archived notifications at/dashboard/archivedwithin the notifications slot, the other slots – children, users, and revenue – remain unaffected. These slots continue to display whatever content they were showing before, and are not influenced by the shift in the URL path from/dashboardto/dashboard/archivedor the reverse. - Page Reloads: In the case of a page reload, Next.js immediately searches for a
default.tsxfile within each unmatched slot. The presence of this file is critical, as it provides the default content that Next.js will render in the user interface. If thisdefault.tsxfile is missing in any of the unmatched slots for the current route, Next.js will render a 404 error. For example, reloading the page after navigating to/dashboard/archivedresults in a 404 error because there is nodefault.tsxfile in the children, users, or revenue slots. Without this file, Next.js cannot determine the default content for these slots on the initial load.
Let’s take a closer look at including the default.tsx file in our dashboard route.
The default.tsx file in Next.js serves as a fallback to render content when the framework cannot retrieve a slot's active state from the current URL. You have complete freedom to define the UI for unmatched routes: you can either mirror the content found in page.tsx or craft an entirely custom view
In our scenario, to prevent 404 errors when rendering the /dashboard/archived route, we will include default.tsx files. For simplicity, the content from page.tsx will be replicated in default.tsx. This means that for each slot, default.tsx will display the same user interface as its corresponding page.tsx.
Our dashboard layout comprises four slots:
<div>
  <div>{children}</div>
  <div>{users}</div>
  <div>{revenue}</div>
  <div>{notifications}</div>
</div>
In this layout, only the @notifications slot has a designated component for the /archived route. To prevent 404 errors for the other sections when accessing this route, we need to set up default views. These default views should be at the same level in the directory structure as page.tsx. Here's how we'll do it:
// app/dashboard/default.tsx
export default function DefaultDashboardPage() {
  return <div>Dashboard</div>;
}

// app/dashboard/@revenue/default.tsx
export default function DefaultRevenueMetrics() {
  return <div>Revenue Metrics</div>;
}

// app/dashboard/@users/default.tsx
export default function DefaultUsersAnalytics() {
  return <div>User Analytics</div>;
}- children slot: Define
default.tsxwithin the dashboard folder. This will serve as the fallback view for the ‘children’ slot. - users slot: Define
default.tsxinside the@usersfolder. This will serve as the fallback view for the ‘users’ slot. - revenue slot: Define
default.tsxin the@revenuefolder. This will serve as the fallback view for the ‘revenue’ slot.
With the default.tsx files set up as described, if you reload localhost:3000/dashboard/archived, the page will load correctly instead of showing a 404 error. Here's what happens:
- The 'notifications' slot will show its specific content from the
archivedsubfolder, as it's the only slot with a component defined for the/archivedroute. - The other three slots - 'children', 'users', and 'revenue' - will display the content from their respective
default.tsxfiles. These files act as fallbacks for routes without specific content.
This approach ensures that you don't accidentally render a route that shouldn't be parallel rendered.
Before we conclude, let's briefly discuss conditional routes. Parallel Routes offer a way to implement conditional routing. For instance, based on the user's authentication state, you can choose to render the dashboard for authenticated users or a login page for those who are not authenticated.
import { getUser } from "@/lib/auth";

export default function Layout({
  children,
  users,
  revenue,
  notifications,
  login,
}: {
  children: React.ReactNode;
  users: React.ReactNode;
  revenue: React.ReactNode;
  notifications: React.ReactNode;
  login: React.ReactNode;
}) {
  const isLoggedIn = getUser();
  return isLoggedIn ? (
    <>
      {children}
      {users}
      {revenue}
      {notifications}
    </>
  ) : (
    login
  );
}
If the login route fails to render, please restart the development server.
Next.js 14's parallel routes offer a powerful way to build dynamic and complex user interfaces. This approach not only simplifies code management but also enhances user experience with independent route handling and sub-navigation.
Key Takeaways:
- Parallel routes allow simultaneous rendering of different pages within the same layout.
- Parallel routes are defined using slots.
- Slots organize content in a modular fashion, making code more manageable.
- The use of
default.tsxfor unmatched routes ensure a consistent user experience, even when certain content sections don't have a direct match in the URL. - Parallel Routes can be used to implement conditional routing
Builder.io visually edits code, uses your design system, and sends pull requests.
Builder.io visually edits code, uses your design system, and sends pull requests.


 Connect a Repo


